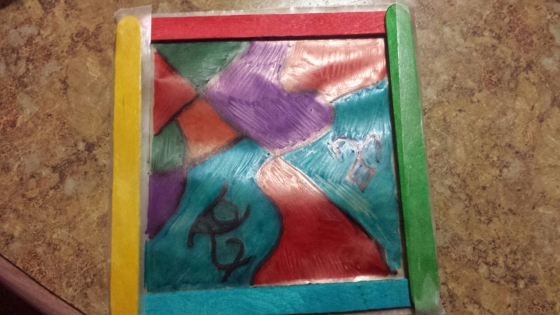
Crafty Stained Glass

image

This was a project, adapted from this site, that was easy to throw together as a last minute rainy day activity. I shouldn’t say rainy, it was just dripping a little, but I wanted to get the kids off the kindles! All you need is wax paper, popsicle sticks, glue and markers, I used the sharpies I got for shield decorating.

image

First you need to make your frames. I used hot glue on the corners to make sure they were sturdy.

image

I used my trusty glue sticks to attach the wax paper to the frames. I folded the excess over and used more glue to ensure a sturdy hold. Cut off the excess if you so desire, I did.

image

image

Let the kids loose with the markers. I put them on a foam plate to protect my table, but it ended up not being necessary.

image

I geeked out a little on mine, adding shadowhunter runes. After all, a sharpie is a mundane’s stele!

image

I used tape to attach yarn as a means of hanging it.
Then you hang it in a window to add some color to your plain old windows! Gorgeous, simple and super fun for the kiddos!
Color on!

Duct Tape Flower

image

How freaking cool is this? I’ve seen these in a couple of places and figured, if you can’t find the directions on Pinterest, where else can I find them? Well, find them I did! It was another one of those link off a link and so on, but oh, did I find them!
You start with a pencil or a pen that you want to flower-ize. Pick your duct tape and prepare to be busy for awhile.

image

You take a small piece of a duct tape and tape the end of your writing utensil.

image

You start making your petals with 2 1/2″ pieces of duct tape. Easiest way to do this is going to be find a particular finger length that is closest to that length. For me, that was the length of my thumb to the bottom of my knuckle.
You take your piece and fold the end into a triangle. You attach the squared off bottom to your pencil, wrapping the edges around it so the triangle side is sticking up. You can choose a random pattern, as I did, or continue around your pencil in a circle. I’ve seen them where people have alternated colors for a specific pattern, but I didn’t want to get super fancy on my first attempt.

image

This was a few layers in, and don’t worry, it will fill itself out the more layers you add. It’s easiest to do this if you put on a movie to keep your mind occupied. Once you find your groove, it’s easy to keep going! I was dealing with an impatient three year old, so mine wasn’t super full.

image

Once you get to the desired fullness of your flower, you can add a leaf if you’d like. I had some Minnie Mouse duct tape in the house, so while my leaf looks a little silly, it has an entire Minnie. For your leaf, you cut a piece slightly longer than your petal pieces, then fold it almost completely in half. Make sure you keep enough of the sticky side exposed to wrap around the pencil! Then you cut out a leaf shape from the doubled up part of tape and attach it the same way you did your petals.

image

Chiara was enthralled with her flower for quite a while and I see myself making some more very soon. Memo to self: pick up more duct tape!
To check out the site I got my directions from, go to http://www.wittyliving.com/kids-crafts/flower-crafts/2076-duct-tape-flower.html
Follow me on Pinterest: Stephanie DeSantis for other fun things I want to try!

My Fishy Valentine

20130707-211916.jpg

I know I’m out of season, but this is one of the few pins I completed well before I started blogging myself!
Arthur just finished his last year of preschool, he’s off to kindergarten this fall, and I didn’t want to do the traditional store bought valentines. I’m not saying there is anything wrong with them, but I’ve always bought them, so I wanted to be different this year.
Schools these days are really cracking down on what’s healthy and what’s not. I’m not saying my kids sit around popping chocolate drops all day, but I don’t see anything wrong with candy every once in a while!
Enough of that rant! I know goldfish are on the approved snack list, so I knew this would be ok with all the other parents.
I’m a big scrapbooker, so I have a whole lot of paper in my stash. Then it was just a matter of making myself a fishbowl stencil and cutting them all out. There weren’t that many kids in his class, so I decided to include his teachers too.
I couldn’t find any bags that would work, primarily because I waited until zero hour to try and put this all together, but a Longaberger friend saved the day with these. Thanks Theresa! I raided Tony’s supply of teeny tiny zip ties, the ones he never uses, to seal them off.
I was really excited with how they turned out, but looking back at the original pin, I found a few differences. I’m ok with those differences, but they are as follows:
1. Original pinner used white paper and drew a water line to show the fish bowl.
2. Somehow the original pinner shaped her bag around the bottom of the fishbowl.
As I said, I’m completely ok with the differences, but just thought you ought to know. ^.^
Happy Valentine’s Day, even though we’re less than half way there!
Original pin is on the blog site http://www.sugarbeecrafts.com/?m=1

T-shirt to fitted shirt

T-shirt to fitted shirt

I was really excited to find this pin because I have a lot of T-shirts! I used to get T-shirts on vacation for the different places we go and now I’ve reached a point where I like my shirts to fit a little better. As soon as I read the directions, all I could think was, knot blanket. If you’ve ever made a knot blanket, you can handle this one!
Directions: Pick your shirt and turn it inside out. You cut the bottom seam off so the shirt can curl a little bit. (It sounds crazy, but trust me, you want a little curl). You cut the sides of the shirt (by this I mean cut the seam off). The original pinner ‘cheated’ the sides a little (curved the seam cut to be more of an hourglass shape) so I did the same. You continue the cut around so you cut the bottom of the sleeve off. After this it’s back to the knot blanket idea. The strips are only 1 or 2″ and make sure you cut both sides at the same time so they line up! I did one side at a time to help keep me aligned. You just start knotting the strips together once they’re all cut. It will pull up on the sides, but trust me, it all works out! Once you have both sides and underarms knotted, turn the shirt right side out and put it on! You will have a few little holes on the side because it’s not seamed, but if you put an undershirt on, it gives it a cute look! Or you can be like me and realize it’s side skin and nothing scandalous!

It occurred to me that some of you might want to see the original pins so feel free to follow me on Pinterest at ads061006

View original pin here